ين
If you are a normal person — you know...
اذا انت شخص عادي
-- انت تعرف...
one who's awake during the day and asleep at night, then it should be about 6 am. Take a shower then impatiently eat a good meal while you look forward to building your excellent new toy.
منظمة الصحة العالمية واحد خلال اليوم مستيقظا ونائما في الليل ، ومن ثم ينبغي ان يكون حوالى الساعة 6 صباحا. اخذ دش ثم الصبر وجبة الطعام جيدا حين كنت اتطلع الى بناء الممتازة الخاصة بك لعبة جديدة.
Note that the first image(s) for each step are the grayscale images from the Raptor V2 instruction manual.
نلاحظ أن الصورة الاولى (ق) وفي كل خطوة من الخطوات هي بالتدرج الرمادي صور من raptor V2 دليل التعليمات.
Step One — Fuel Tank Assembly
خطوة واحدة -- الجمعية خزان وقود 
The instructions indicate that you must build the fuel tank but it comes already built.
التعليمات التي يجب ان تشير الى ان بناء
خزان وقود ولكن الامر تم بناء.
Pull out the stopper and inspect the fuel line for damage. Rinse the tank and line and allow them to dry thoroughly before reassembling the tank. No, you may not take a break now.
الانسحاب فان سداده وتفتيشها فى خط الوقود عن الضرر. التشطيف الدبابه والخط والسماح لها الجافه تماما قبل اعادة الدبابه. لأ ، انت ، ولا يجوز أن تتخذ كسر الآن.
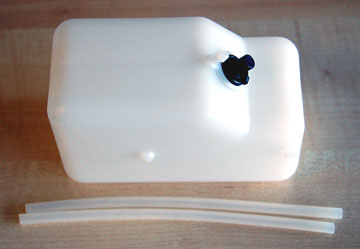
Do not connect any fuel tubing to the outside of the tank until the model is completely built and set up. There's no point in having the tubing in the way and abrading it against various assemblies in the heli while you're working on it.
لا وقود اي ربط الانابيب الى خارج الدبابه حتى النموذج تماما وانشاء بنى. لا يوجد في وجهه بعد ان الانابيب في الطريق والضرب ضد مختلف الجمعيات في heli بينما أنت تعمل على ذلك.
You might want to connect the two nipples with a short piece of tubing to keep crud out of the tank.
قد ترغب في ربط اثنين من حلمات قصيرة مع قطعة من الخام وانابيب ان تبقى خارج الدبابه.
Step Two — Clutch Bell Assembly
الخطوة الثانية -- الجمعية التشبث الجرس 
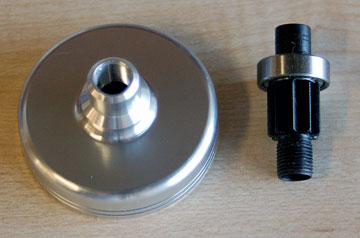
Parts for this assembly.
قطع الغيار اللازمة لهذه الجمعية. 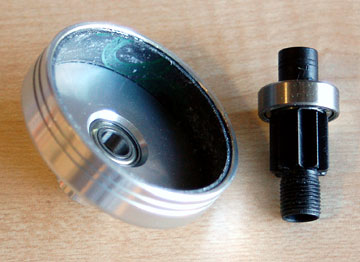
The clutch liner is already installed as is the lower bearing . All you need to do is thread the drive gear into the clutch bell .
فإن التشبث بطانة تركيبها بالفعل كما هو ادنى واضعة كل ما عليك القيام به هو الخيط الدافع والعتاد الى التشبث الجرس. 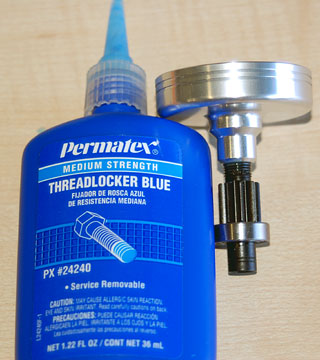
Clean the threads of both parts using alcohol. Apply Loctite before threading the parts together.
خيوط تنظيف كل اجزاء باستخدام الكحول. التخييط قبل تطبيق loctite الاجزاء معا. Never apply Loctite to plastic parts. First, it doesn't work on plastic. Second, it may attack the plastic.
Loctite تنطبق أبدا على اجزاء من البلاستيك. فهي ، اولا ، لا العمل على البلاستيك. الثانية ، قد ضرب من البلاستيك.
Use Loctite only on metal-to-metal parts.
Loctite فقط على استخدام المعادن الى اجزاء معدنيه.
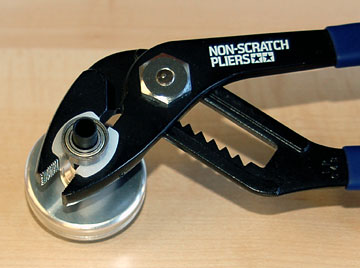
The instructions give no indication of what tool(s) you should use to tighten the gear to the bell. I suspect that if you hand tighten it then it will become tighter as the helicopter is run, but I could be wrong about that.
التعليمات لا تعطي دليلا على ما اداه (ق) يجب ان تستخدم لتشديد والعتاد الى الجرس. واعتقد انه اذا كنت من جهة تشديد ومن ثم ستصبح اكثر صرامه كما هو تشغيل طائرات الهليكوبتر ، ولكنني يمكن أن يكون الخطأ في ذلك.
I used nylon jaw pliers (Tamiya) to grasp the gear and tighten it.
كنت نايلون الفك الزرديه (tamiya) من أجل فهم والعتاد وتشديد.
By the end of this step the frames will be joined having everything in between that must be added beforehand.
وبحلول نهاية هذه الخطوة فإن الاطر وسينضم بعد كل ما فى وبين انه يجب ان تضاف مسبقا. 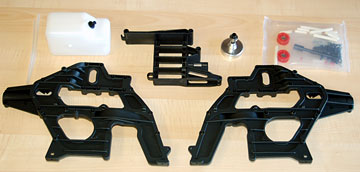
The parts needed for this step. Put the fuel line aside for now. We won't add it until the helicopter is built.
الأجزاء اللازمة لهذه الخطوة. الوقود وضعت جانبا لخط الآن ، ولن نقبل ان اضيف انه حتى تقوم طائرات الهليكوبتر. 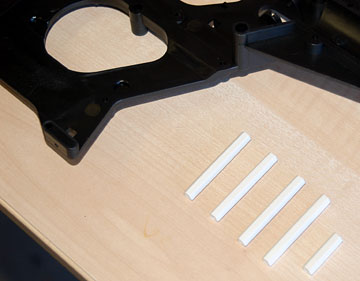
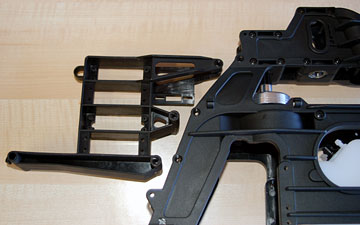
You'll notice that there are two lengths of frame posts . There are four long posts and eight short posts.
انت سوف تلاحظ ان هناك اثنين من اطوال اطار وظيفة. وهناك أربع وظائف طويلة وقصيرة ثماني وظائف. 
These are the locations of the long posts.
وهذه هي المواقع طويلة من الوظائف. 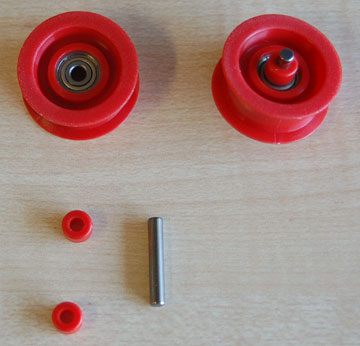
Assemble two guide pulleys . These pulleys push the tail rotor drive belt together so that it doesn't rub on the frame or tail boom.
التجمع الثاني دليل البكرات. البكرات دفع هذه الذيل حملة الحزام الدوار معا حتى لا التدليك على الاطار او الذيل الازدهار. Place a collar on the pin , slide the pin through the pulley and then push a collar on the other end of the pin.
مكان
الياقه على
رقم التعريف الشخصي ، فإن الشريحه من خلال رقم التعريف الشخصي البكره وبعد ذلك دفع أ الياقه على الطرف الآخر من رقم التعريف الشخصي.

The pulleys are located just in front of the tail boom. Stops are molded in that will prevent the pin from coming out.
البكرات موجودة فقط في الذيل امام الازدهار. قفات مصبوب في هذا الرقم من شأنه ان يمنع من الخروج. One pulley goes in each half of the frame.
وغني عن بكرة واحدة في كل شوط من الاطار.
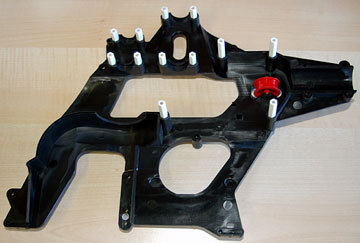
The pulley and all of the posts in place. You can screw the frame to the posts now or wait until the second frame half is in place.
البكره وجميع الوظائف في مكان يمكنك برغي الاطار الى وظيفة الآن أو الانتظار حتى الثانية والنصف هو في الاطار. 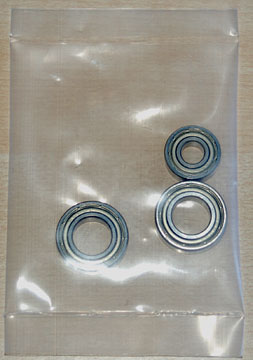
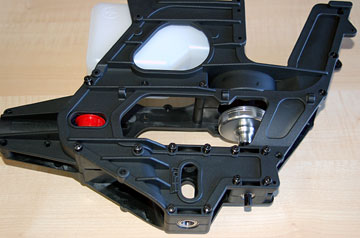
These three bearings must be in place before the frames are joined.
هذه الاتجاهات الثلاثة لا بد ان تكون موجودة قبل الأطر وانضم. The two larger bearings are for the main shaft. The smaller bearing is for the starter shaft that engages the clutch.
هما الاكبر حجما هي الاتجاهات الرئيسية للرمح. الاصغر حجما واضعه هو اشارة الانطلاق لشافت ان يشرك الفاصل.
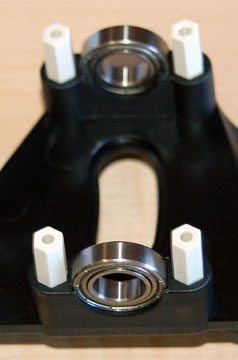
The main shaft bearings.
رمح الاتجاهات الرئيسية. 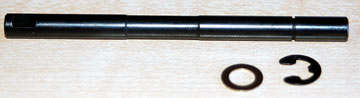
The starter shaft .
رمح الانطلاق. 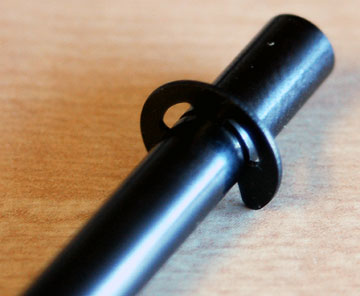
Place an E-clip in the groove cut into the starter shaft.
ه
- وضع علامة كليب في الأخدود قطع رمح الى الانطلاق. 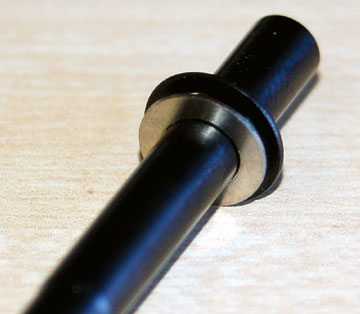
Slide the washer up to the E-clip.
الشريحه الغساله إلى ه
- كليب. 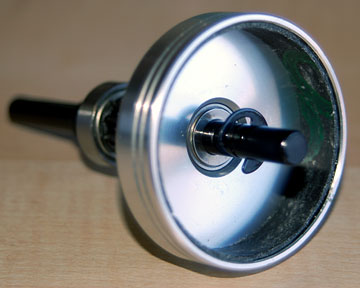
Slide the starter shaft into the clutch bell with the E-clip and washer inside the bell.
رمح الشريحه الانطلاق الى التشبث الجرس مع التجارة
الالكترونيه داخل الغساله كليب والجرس. 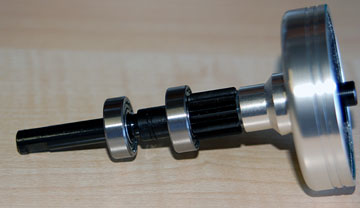
One bearing is already on the drive gear. Slide the second bearing on.
وإذ تضع بالفعل واحد على حملة والعتاد. الشريحه الثانية اثر علي. 
Clean the end of the starter shaft with alcohol. Also clean the set screws and starter coupling .
النظيفه نهاية الانطلاق رمح مع الكحول. نظيفة ايضا مجموعة براغي واقتران المبتدئين. The starter coupling allows a 6 mm hex shaft to be used in your electric starter to start the engine.
الانطلاق يسمح بالربط بين 6 مم الهيكس رمح لاستخدامها في بدء الكهرباءيه الخاصة بك لبدء المحرك.
The starter shaft has two flats on the end for the set screws to engage.
الانطلاق رمح اثنين من الشقق على وضع نهاية للبراغي للدخول.
Put Loctite on each of the two set screws and insert the screws into the starter coupling just a couple of turns.
Loctite على وضع كل واحد منهما على
مجموعة براغي وبراغي تضاف الى الانطلاق اقتران بضع تتحول.
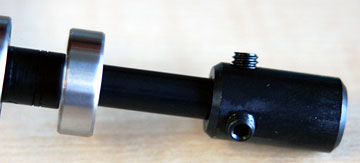
Slide the starter coupling onto the starter shaft and tighten the set screws lightly against the flats.
الشريحه الانطلاق اقتران الانطلاق على رمح وتشديد مجموعة براغي باستخفاف ضد الشقق. After the frames are bolted together, loosen the set screws slightly. Push the starter shaft up against the inside of the bell. Push the starter coupling down until it touches the bearing. Securely tighten the set screws.
بعد الاطر اندفع معا ، أن تخفف قليلا مجموعة البراغي. دفع الانطلاق رمح حتى ضد من داخل الجرس. اقتران دفع الانطلاق الى اسفل حتى انها تمس حمل. تشديد امن مجموعة البراغي.
Oil the shaft using a light oil.
رمح النفط فان استخدام النفط الخفيف.
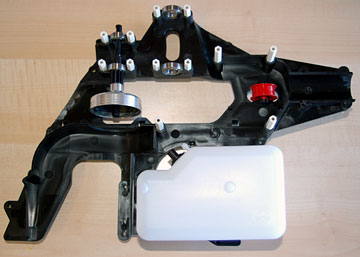
Place the clutch bell/starter shaft assembly in the frame.
وضع الجرس التشبث / رمح الانطلاق في اطار الجمعية العامة. Add the fuel tank. The fuel tank has two molded protrusions that engage the frame. You'll see where they are when you get there.
اضافة خزان وقود.
خزان وقود اثنين مصبوب نتوءات ان اشراك الاطار. سترى فيها عندما نصل الى هناك.
Align the second half of the frame and slide it onto the posts. Screw both frames to the posts.
جعل النصف الثاني من هذا الاطار وانه على شريحة الوظائف. برغي كل من اطر لهذه الوظائف. Be gentle when tightening these screws. They will not come loose on their own. If you tighten them too much the plastic will strip.
عندما يكون لطيف تشديد هذه البراغي. انها لن تأتي الا فضفاضة بنفسها. تشديد اذا كنت منهم الكثير من البلاستيك سترفع.
Insert the servo frame and screw it in place from both sides.
تضاف الماكينه المساعدة في الاطار الزمني والبرغي في مكانه من كلا الجانبين. 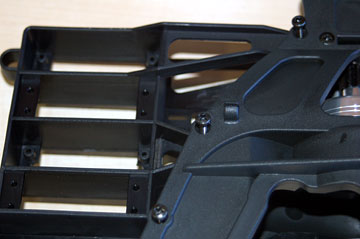
These are the three screw locations that hold the servo frame in place.
وهذه هي المسمار المواقع الثلاثة التي تمسك الماكينه المساعدة في الاطار. 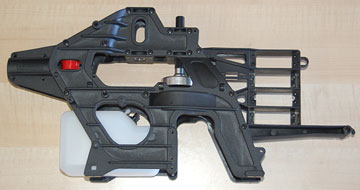
Part one of the frame assembly is complete.
ؤ
